

Will it work? DIY Headlight Renewal
The headlights on my '08 Saturn Astra are super oxidized and "foggy" from UV damage. I've already used one of those headlight refurbishing kits, and it worked for a while. But now the lenses are so cloudy that it noticeably dims the headlights when they are on. Here's a shot of the driver's side headlight assembly to give you an idea of the problem.
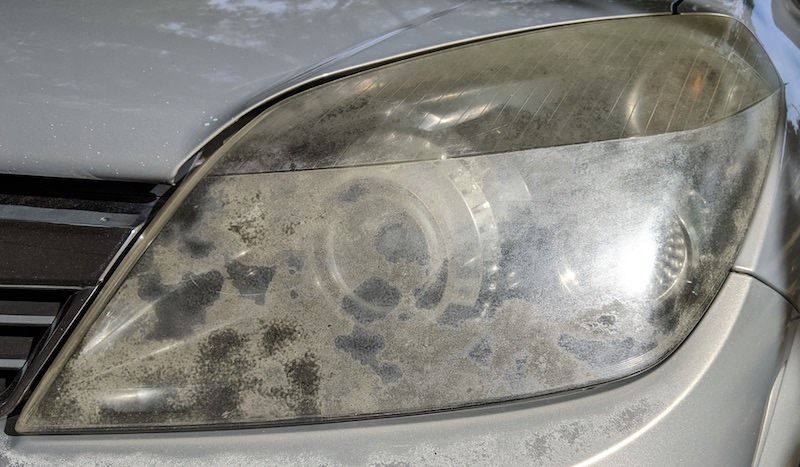
It's pretty bad, eh? And now that we live in a highly populated area where there are lots of pedestrians out and about—and now that it gets dark earlier and stays dark longer—I need to make sure that my headlights can do what they are supposed to do.
I thought about just replacing them, but the headlight assemblies are (a) difficult to find and (b) very expensive when you do find them. The cheapest ones I found were at a salvage yard, and they were priced at $150 each, which is not that bad at all. However, I couldn't tell for sure from the photos of the lights that they posted, but it sure looked like they, too, have the same "fog" problem. For comparison, I just priced the lights at GM Parts Store Canada, and they are $426.04 each. Uhhhh, yeah. So, I'm going to try to refurb them again following a similar method to what I used before, but one that is different in a couple of important ways.
I have decided to follow the method demonstrated by ChrisFix on his YouTube channel. His method is similar to what you do with a kit, except for a couple of very important things: (1) the preparation is much more meticulous and (2) it involves coating the sanded and cleaned headlight assembly with clear coat that protects against the sun's UV (now my previous post should make a bit more sense). Today, I had enough time to prep the passenger side headlight. First, I taped it off so that I wouldn't accidentally sand the body of my car (but note in the above photo that the plastic bumper cover has also suffered UV damage, so the body is certainly not pristine). Then I wet sanded the headlight with four different grits: 600, 800, 1200, and 2000. I took my time on this step, and I might even sand it once more with 2000 or 2500 grit tomorrow. Anyway, I then cleaned the lens with 100% isopropyl alcohol to get it nice and clean. I then taped a black plastic garbage bag to the hood and front quarter panel and got ready to spray the clear coat—but a breeze picked up and was blowing right toward my neighbour's cars. Now, my Dad was a painter and I worked for him, so I know what happens when paint mist (or clear coat mist) drifts in the wind and gets on people's cars—a whole lot of cleaning. So, I pulled the plastic bag off and decided to wait until tomorrow, which is not supposed to be windy.
Anyway, here's what it looks like now, before clear coat:
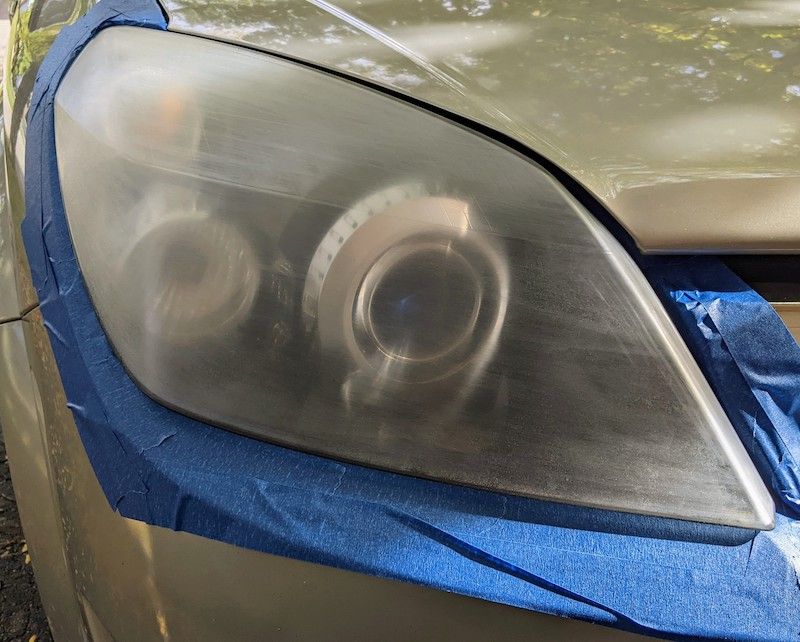
I am sure that you can see the scratches in the plastic lens. According to my research (more YouTube videos, of course!), that's normal. Everyone says that the clear coat will settle into these scratches and fill them in ending up in a clear, smooth finish—if it's applied evenly, of course. Nevertheless, I will still probably give it one more sanding (or two or three) with a super fine grit sandpaper. Honestly, though, this light actually already looks better than it did before I started.
I'll keep you posted on the outcome, even it it's super bad and I become forced to buy expensive replacements!
